Part 1: Identify Editing Workspace Panels
Introduction
To understand how to edit in Adobe Premiere Pro, you need to know what the different panels and windows in the program do. Adobe Premiere Pro offers different layouts of its windows and panels. These are called workspaces.
The Audio workspace displays windows and panels focusing on audio tools, and the Color workspace layout has tools for adjusting colors. You can see screenshots of those below.
The Audio workspace displays windows and panels focusing on audio tools, and the Color workspace layout has tools for adjusting colors. You can see screenshots of those below.
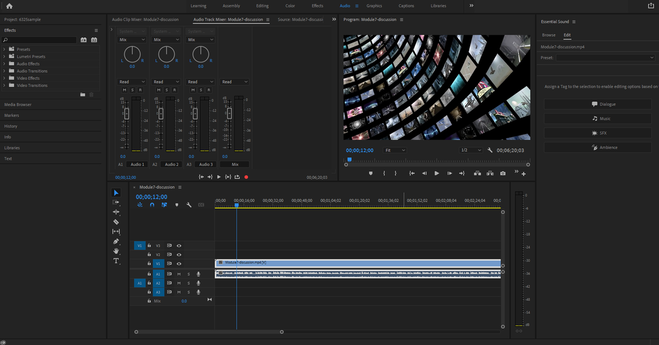
Screenshot of Audio Workspace
|

Screenshot of Color Workspace
|
By default, Adobe Premiere Pro opens in the Editing workspace view, which is what we'll be using in this course. In this lesson, you'll learn what elements make up the Editing workspace and how they relate to each other. Knowing this will help set up your own editing workflow.
Editing Workspace
As mentioned in the introduction, Adobe Premiere Pro offers different workspace layouts. The workspace options are located on the top of the program. The active workspace is in blue text. If the Editing workspace is not selected, click on the name to open the workspace.

Screenshot of Premiere Workspace Tabs
We'll focus on four main areas within the Editing workspace:
- the Project Panel
- the Source Monitor
- the Timeline, and
- the Program Monitor.
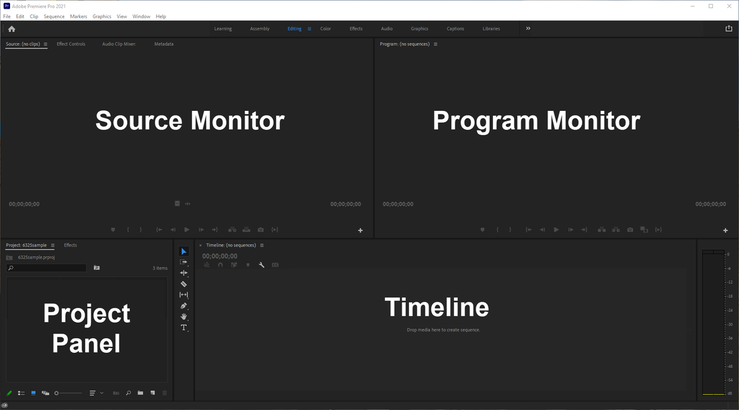
Screenshot of Adobe Premiere Pro Editing Workspace
Project Panel
This holds the content for an editing project, such as videos, audio, pictures, and graphics. By default, it's located on the bottom left of the program in Editing workspace. There are several file formats that can be imported to the project panel, including Illustrator files, .mp3 files, and Photoshop files. You can find a list of the supported file types which can be used in a project on the Adobe website.
We'll cover how to get files into the projects panel in the next lesson. For now, know the project panel is where all the content for your final video will be held. You can create folders within the project panel to organize your content. These folders are called bins.
We'll cover how to get files into the projects panel in the next lesson. For now, know the project panel is where all the content for your final video will be held. You can create folders within the project panel to organize your content. These folders are called bins.
Source Monitor
The Source Monitor is located on the top left of the default Editing workspace. When an item in the project panel is double-clicked, it appears in the Source Monitor. You can preview the video/image/audio in the Source Monitor. For videos and audio files, you can select what parts of the file you want to add to your video project. For example, if you imported a minute-long video into the project, but you only want to include 10 seconds of it, you can choose those 10 seconds in the Source Monitor.
You make that selection by marking the in point (or starting point) and the out point (or ending point). We'll cover that later in Lesson 3.
You make that selection by marking the in point (or starting point) and the out point (or ending point). We'll cover that later in Lesson 3.
Timeline
The timeline holds sequences. Think of the timeline as a driveway, and sequences as vehicles. The timeline is just a place to load and unload a vehicle.
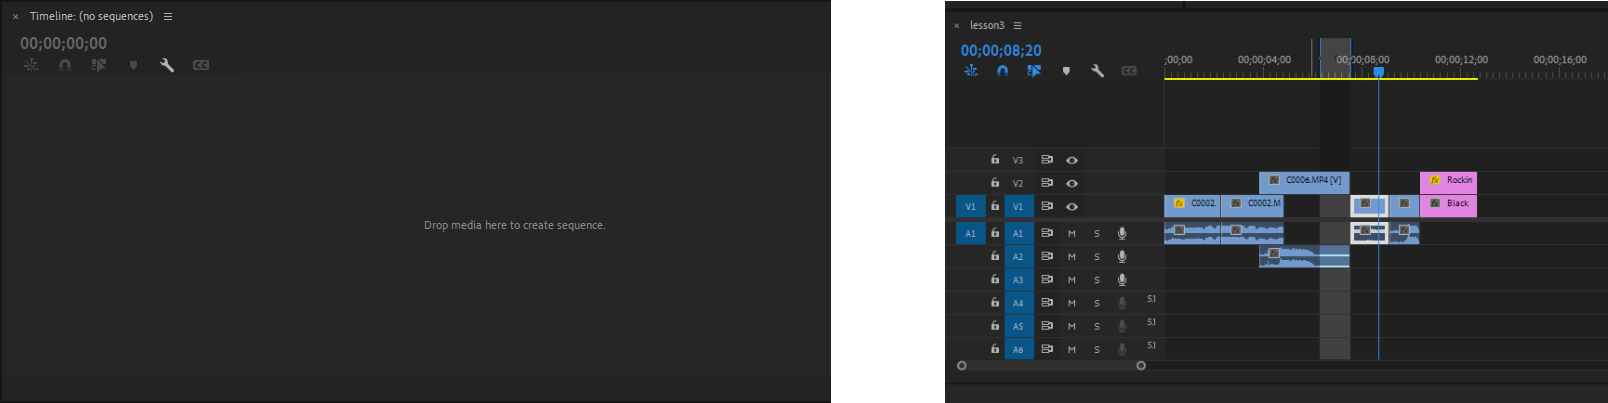
On the left, an empty timeline. On the right, a timeline with a sequence open.
A sequence is the video you're putting together. With a sequence open on a timeline, you can add and arrange media elements as you want them to appear on your final video. More than one sequence can be open on the timeline.
Media elements being added to a sequence can come from the Source Monitor or directly from the Project Panel to the timeline.
Media elements being added to a sequence can come from the Source Monitor or directly from the Project Panel to the timeline.
Program Monitor
The Program Monitor is usually located on the top right of the Editing workspace. It is shows you a preview of your final edited video. Whatever part of the timeline the blue playhead is located over appears on the Program Monitor.
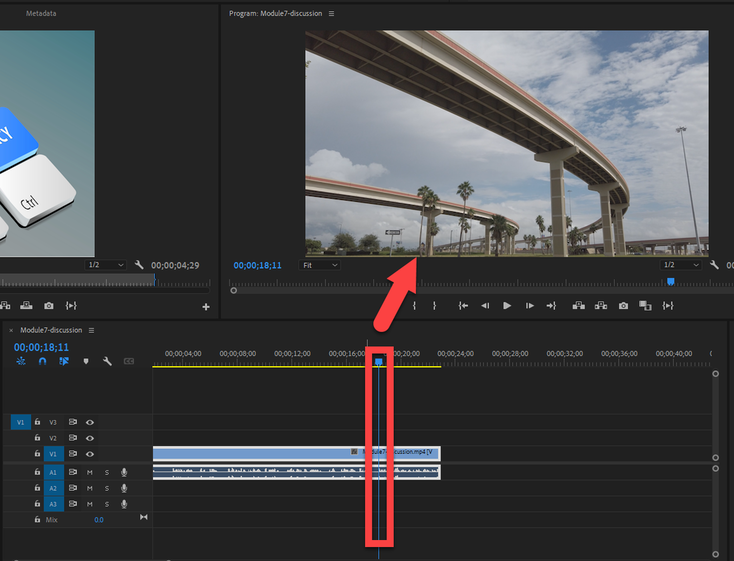
Screenshot showing video under playhead on timeline appearing on the Program Monitor
Next Steps
Adobe Premiere Pro offers so many tools it provides different layouts, so tools needed for specific work can be easily accessed. For example, the workspace for captions displays windows and panels not often used in graphics and vice versa. The default workspace is the Editing workspace, which is what this course will focus on. In this lesson, we reviewed major parts of the workspace: the Project Panel, Source Monitor, Timeline, and Program Monitor.
In the assignment for this lesson, you'll review what those areas are used for and how they are connected. But, first, read the discussion question on the next page and post your response.
In the assignment for this lesson, you'll review what those areas are used for and how they are connected. But, first, read the discussion question on the next page and post your response.