Part 3: Editing
Introduction
Adobe Premiere has tools for audio production, graphics, color correction and even captions. These are all supplemental to basic video editing. In this lesson, you'll learn the (very) basics of selecting what you want to include in your edited video and arranging it in the order you want. When you complete this lesson, you'll know how perform basic video edits in Adobe Premiere Pro.
As the previous lesson on importing showed, there are lots of ways to do the same action. Some are very nuanced. In comparison to those, this lesson will be a sledge hammer. But it will show you how to edit in Premiere Pro quickly.
As the previous lesson on importing showed, there are lots of ways to do the same action. Some are very nuanced. In comparison to those, this lesson will be a sledge hammer. But it will show you how to edit in Premiere Pro quickly.
Editing Media
Creating a new sequence
In Lesson 1, you learned a sequence holds your edited video. To create a new sequence in Adobe Premiere Pro:
In Lesson 1, you learned a sequence holds your edited video. To create a new sequence in Adobe Premiere Pro:
- Go to the File menu.
- Click OK.
- Enter a name for your sequence.
- In the sequence presets, select AVCHD 1080p30.
- Select Sequence. A dialog box will appear.
- Select New.
Steps to create a new sequence in Adobe Premiere Pro
A sequence will appear in the timeline. You can see the sequence name It consists of rows with the letter V or A and a number. These are tracks. V stands for "video". A stands for "audio". V1 is video track 1, A1 is audio track 1, and so on.
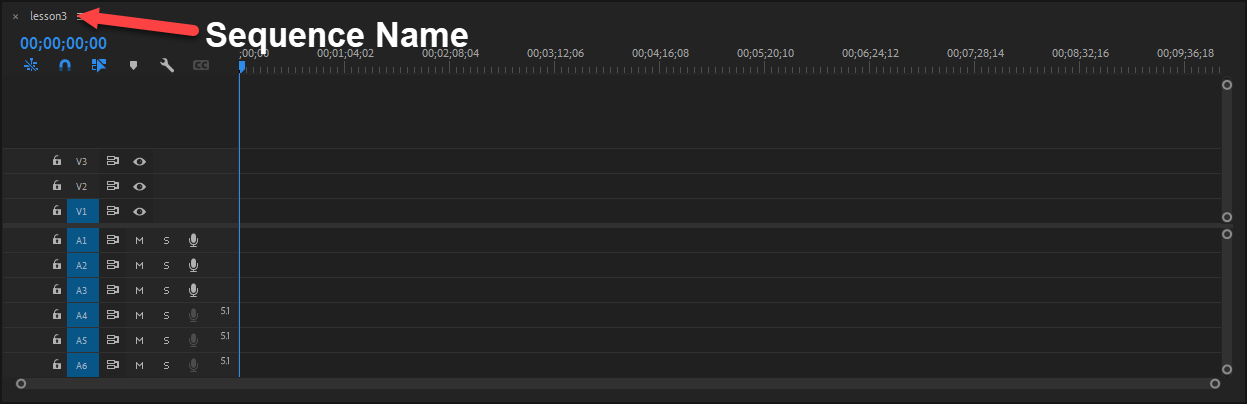
Sequence open on the Adobe Premiere Pro timeline
Adding a media file directly to a sequence
If you're planning to use the entirety of a video or audio clip, you can drag it from the Projects Panel directly onto the sequence. If the clip being dropped onto the sequence isn't the same video size as the sequence, a dialog box will pop up asking if you want to keep the current sequence size or change it to match the clip you're adding. For now, choose keep the current sequence size.
If you're planning to use the entirety of a video or audio clip, you can drag it from the Projects Panel directly onto the sequence. If the clip being dropped onto the sequence isn't the same video size as the sequence, a dialog box will pop up asking if you want to keep the current sequence size or change it to match the clip you're adding. For now, choose keep the current sequence size.
Dragging a video clip directly into a sequence on the timeline
However, you usually don't want to use an entire video or audio clip. This is where the Source Monitor is used to select what part of the clip you do want in a sequence.
Using the Source Monitor to add video to the timeline/sequence
Double-clicking on any of the files in the Projects Panel will open the file in the Source Monitor. Along with previewing media, the Source Monitor allows you to decide which part of the video or audio clip to add to the sequence. Watch the video below to see how to mark in and out points on a clip on the Source Monitor.
Double-clicking on any of the files in the Projects Panel will open the file in the Source Monitor. Along with previewing media, the Source Monitor allows you to decide which part of the video or audio clip to add to the sequence. Watch the video below to see how to mark in and out points on a clip on the Source Monitor.
Using the Selection Tool

|
The Selection Tool lets users select and drag items on the timeline. It's located with other tools on the toolbar, which is found usually to the left of the timeline. You can see which tool is active, because it's highlighted in blue. The image on the left shows the Selection Tool is active.
In addition to selecting clips, you can also use the Selection Tool to trim or lengthen clips on the timeline. When you place the select tool at the left or right edge of a clip, it turns into a red bracket. When the red bracket appears, you can hold down the left mouse button and move the edge of the clip to change the duration. 
Using the Selection Tool to trim clips
|
Moving clips on the timeline
To move a clip on the timeline, you can click and drag it to another spot on the sequence, using the Selection Tool. Caution: If you drag a clip and it overlaps another clip, the overlapped portion of the clip was deleted.
To move a clip on the timeline, you can click and drag it to another spot on the sequence, using the Selection Tool. Caution: If you drag a clip and it overlaps another clip, the overlapped portion of the clip was deleted.

Rearranging clips on an Adobe Premiere sequence
To overlap clips without deleting part of one, drag the overlapping clip to another video and audio track. See the example below. The video on the highest or topmost track will be what is visible. In the example below, the clip on video track 2 will be visible when the overlapping part appears in the video.
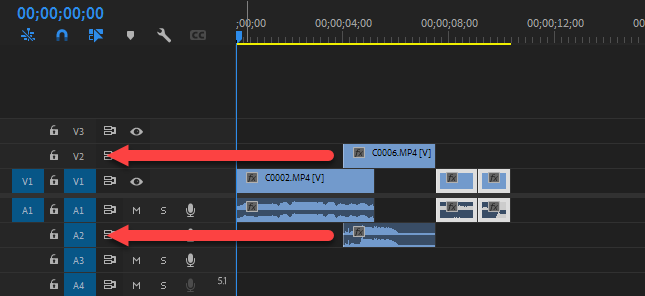
When moving clips, remember this:

|
Using the Razor Tool
If you want to split a clip on the timeline, click on the razor tool (or press C on you keyboard). Place your mouse over the part of the clip you want to split and click. The clip is now split into two parts. 
Splitting a clip with the Razor tool
|
Adding images to the timeline
Watch the video below to walk through the steps of adding an image to the timeline, moving it, and resizing it.
Watch the video below to walk through the steps of adding an image to the timeline, moving it, and resizing it.
Adjusting the size of a video or graphic
If you need to adjust the size of a video or graphic on the timeline, you can using the Effect Controls panel.
If you need to adjust the size of a video or graphic on the timeline, you can using the Effect Controls panel.
- First, select the clip you want to adjust.
- Next click on the Effects Control tab, which is located in the same section as the Source Monitor.
- If it's not expanded already, click the drop-down arrow next to Motion to see the Scale option.
- You can click on the blue number next to Scale and adjust it. You can type in a number or click on the number and drag your mouse to the left or right to adjust the value.
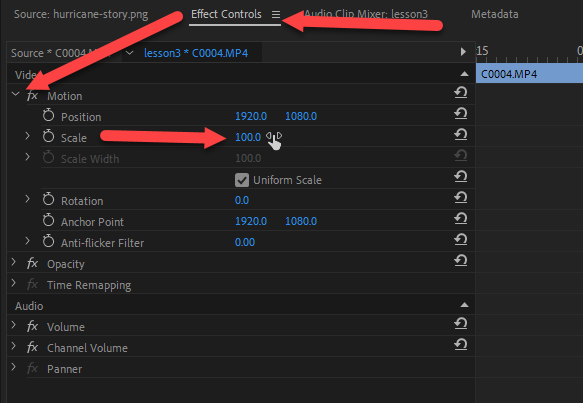
Steps to Access Scale Option
As you can see from the other items in the Effects Controls panel, there are many more video adjustment options available.
Where did the time go?
You'll see timecode in blue on the top left of the timeline. That's the playhead indicator. It shows the timecode for the playhead's position on the timeline. In the image below, notice how the times changes as the indicator is dragged across the timeline.
Timecode shows hours, minutes, seconds, and frames. Time indicators are included above the timeline.
Adobe Premiere Pro sequence playing with yellow arrow pointing to timecode
Playhead indicator times are also displayed on the left side of the Source and Program Monitors. See the image below. On the right side, another timecode is displayed. If in and out points are marked on the player, the number on the right is the duration between the in and out point. If in and out points are not marked in the monitors, the time code shown on the right is the total duration of the clip or sequence.
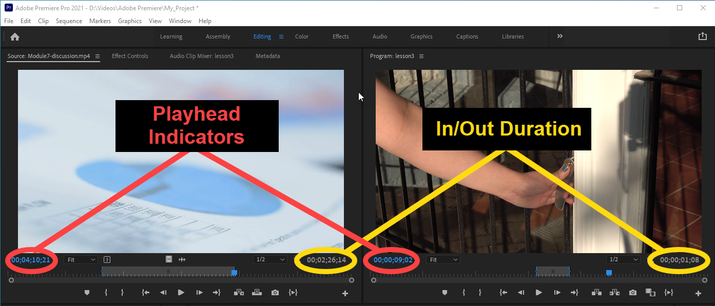
As you build your video editing skills, understanding timecode can help with precise edits, assist in logging videos, and, if nothing else, warn you if your video runs too long.
Next Steps
You now know how to add multimedia elements into Adobe Premiere Pro for a video project. Like other actions in the video editing program, there are multiple ways to access the import option. Some people prefer keyboard shortcuts over using a mouse. Whatever your preference, there are plenty of options for importing that you can choose from.
A tougher choice may be what multimedia elements to include in a project. Sometimes you may not have the video you need. In this lesson's discussion, we'll talk about some free video resources available.
A tougher choice may be what multimedia elements to include in a project. Sometimes you may not have the video you need. In this lesson's discussion, we'll talk about some free video resources available.